A diamond cutting chart is one of the most important reference tools in our industry. It lays out the ideal proportions for different diamond shapes, all geared towards achieving that incredible brilliance and fire everyone looks for.
Think of it as a blueprint. It gives us specific percentage ranges for key measurements like the table, depth, and girdle thickness. These numbers are what guide buyers and jewellers in figuring out how well a stone will handle light.
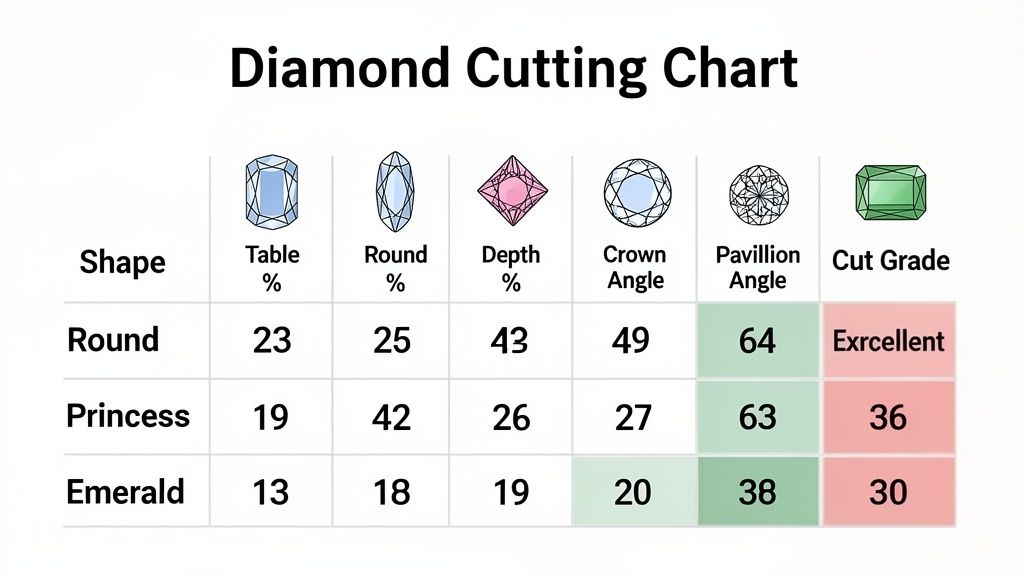
Your Quick-Reference Diamond Cutting Chart
When it comes to a diamond's sparkle, nothing matters more than its cut. It often has a bigger impact than either colour or clarity. While a grading report gives you all the technical data, a diamond cutting chart is what translates those numbers into a real measure of quality. This guide is designed to be an at-a-glance tool to help you instantly evaluate a diamond's potential.
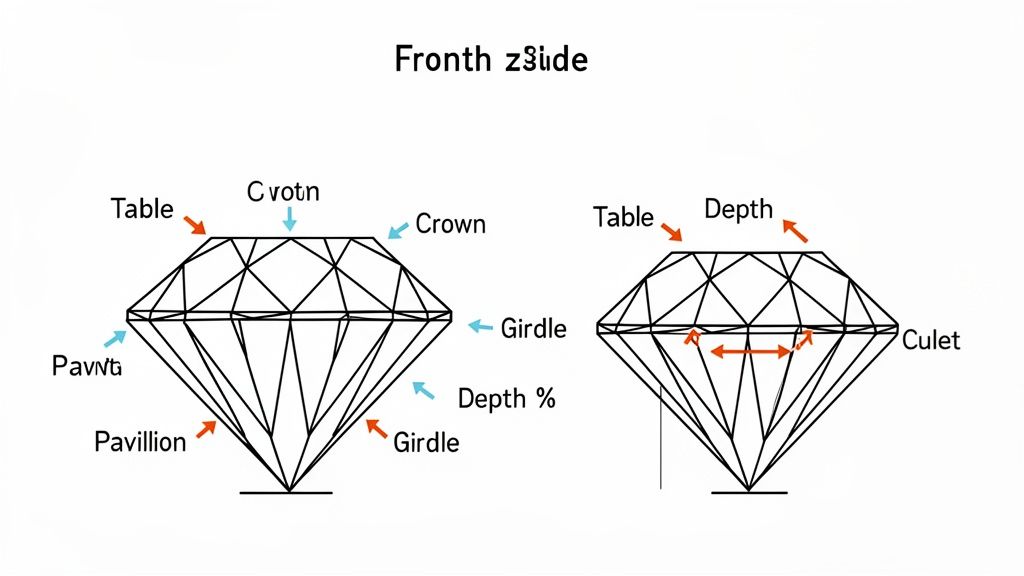
This image below shows the three main measurements that define a diamond's proportions: the table, depth, and girdle.
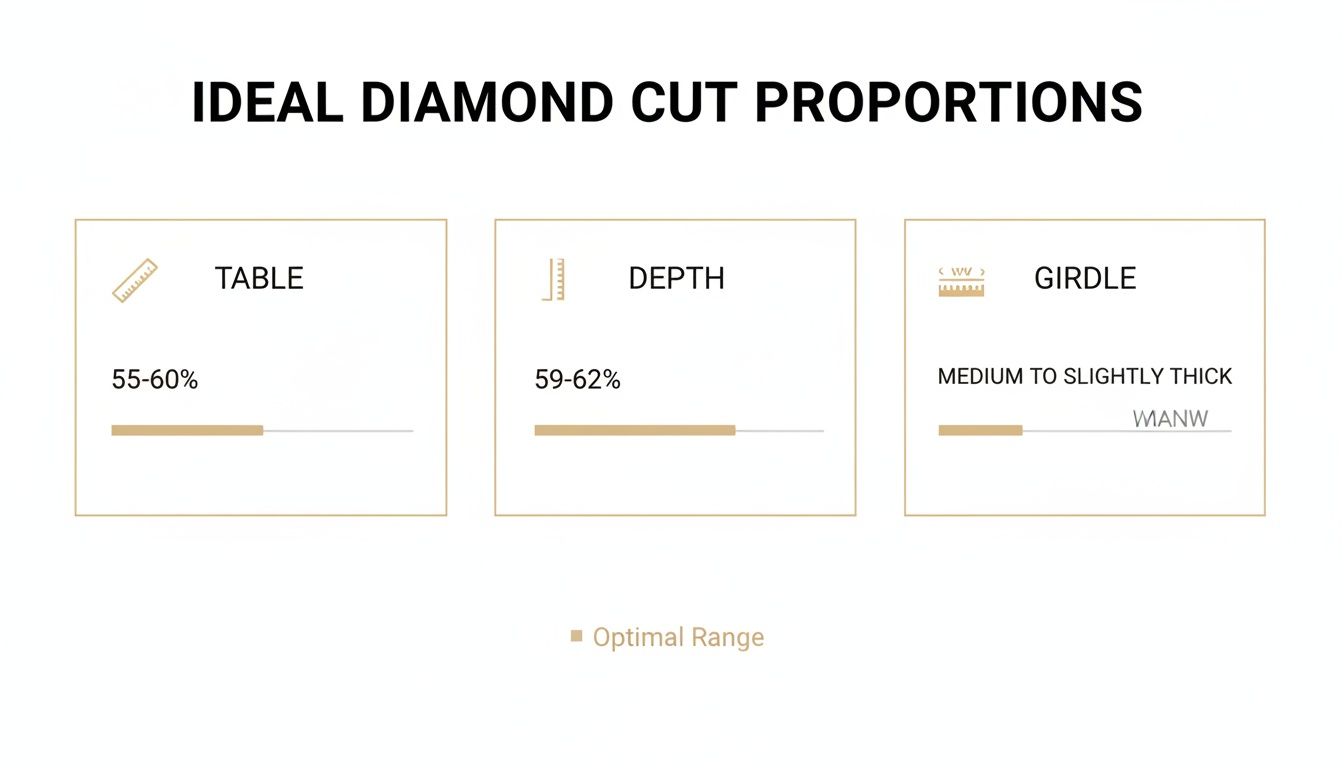
As you can see, each measurement needs to fall within a very specific range to make sure light bounces through the stone correctly. Below, you’ll find a detailed chart that builds on this, covering the most popular diamond shapes. It’s the perfect starting point for comparing a diamond’s specs against the ideal parameters for its shape.
Using this information lets you move past subjective descriptions and make a solid decision based on the science of light performance. This quick-lookup table is here to give you confidence when you're assessing a diamond's beauty and value, whether you’re buying something new or thinking about a re-cut for a family heirloom.
Decoding the Elements of a Diamond Cut
To get any real value out of a diamond cutting chart, you first need to speak the language of gemmology. Every grading report is packed with technical terms that define a diamond's proportions, and it's these elements, working together, that dictate how brilliantly a stone will perform. Think of it as the key to unlocking a diamond's true potential.
These measurements aren't just random numbers; they are the direct result of a cutter's meticulous craftsmanship. The precision of these elements is a huge factor in the final value of the stone and a major reason why London’s diamond trade continues to thrive.
Key Proportions and Their Impact
Understanding a diamond's anatomy starts with its core components. Every single facet and angle is cut to precise mathematical standards, all designed to control the journey of light as it passes through the stone.
Table Percentage: This is the width of the diamond's largest top facet (the "table") divided by its overall width. An ideal table percentage allows light to enter the stone cleanly and reflect back out, creating that signature brilliance. If a table is too large or too small, light simply leaks out of the sides or bottom, and the sparkle is lost.
Depth Percentage: This measures the diamond’s height from its bottom tip (the culet) to the table, divided by its total width. A diamond cut too shallow or too deep just can't reflect light properly. The result is a dull, glassy, or dark appearance, which nobody wants.
The relationship between table and depth is a delicate balancing act. When the proportions are right, light entering the diamond is internally reflected and then shot back to the viewer's eye as that brilliant sparkle we all look for.
A well-proportioned diamond essentially acts like a collection of perfectly angled mirrors. When light enters, it bounces off the internal facets and shoots back out through the top, creating the fire and brilliance that makes a diamond so captivating.
Angles and Finishing Details
Beyond the main percentages, other components on a diamond cutting chart give you a much more complete picture of its craftsmanship. These finishing details are absolutely crucial for maximising a stone's sparkle and overall beauty.
Crown and Pavilion Angles The crown is the top section of the diamond, and its angle is vital for gathering light and creating "fire"—those beautiful flashes of rainbow colour. Meanwhile, the pavilion, which is the bottom portion, must have the perfect angle to reflect that light back up through the crown. If these angles are even slightly off, the diamond loses its life.
Girdle and Culet The girdle is the thin edge separating the crown and pavilion. Its thickness is really important for durability; if it's too thin, the diamond can chip easily, but if it's too thick, it just adds unnecessary weight. The culet is the tiny facet at the very bottom of the diamond, put there simply to stop the tip from chipping.
Getting your head around these details is fundamental when you're looking to buy a special piece. You can learn more by checking out our guide on how to choose an engagement ring.
How to Use a Diamond Cutting Chart
Think of a diamond cutting chart as the key to unlocking a stone's technical data. It turns a complex gemmological report into a practical tool, letting you see exactly how well a diamond has been crafted. It’s a straightforward process: you compare the diamond's specific measurements against the ideal ranges for its shape.
This comparison helps you predict its light performance—the fire, brilliance, and sparkle—far more accurately than just looking at it under a shop light. It empowers you to see beyond a simple sales pitch and make a genuinely informed choice based on craftsmanship.
First things first, you'll need the diamond's grading report. This document lists all the crucial proportions, like its table percentage, depth percentage, and details on the girdle and culet. With these numbers in hand, you can compare them directly to the ideal parameters shown on a reliable chart for that specific diamond shape.
A Step-by-Step Practical Example
Let’s walk through how this works in the real world. Imagine you're looking at a round brilliant diamond and you have its GIA report in front of you.
- Find the Diamond's Shape: The report confirms it's a "Round Brilliant."
- Locate Key Metrics: You find its table is 58% and its depth is 61.5%. The report also describes the girdle as "Thin to Medium."
- Compare to the Chart: Now, you pull up a diamond cutting chart for round brilliants. The chart shows the ideal range for an "Excellent" cut grade is a table of 54-57% and a depth of 59-62.3%.
- Analyse the Results: Here's the reveal. The depth percentage (61.5%) fits perfectly within the "Excellent" range. However, the table percentage (58%) is just outside this top-tier bracket, falling into what is typically considered the "Very Good" category.
So, what does this tell you? It shows the diamond is very well cut and will have fantastic brilliance. But it might not have that absolute peak light performance you’d get from a stone where all its proportions hit the "Excellent" mark.
Comparing a diamond's report to a cutting chart is how you verify the quality of its craftsmanship. This process reveals whether the cutter prioritised maximising sparkle or simply retaining carat weight from the rough stone.
Interpreting the Cut Grade
This simple comparison process is what underpins the final cut grade, which ranges from Excellent down to Poor. A diamond that ticks all the "Excellent" boxes on a diamond cutting chart is one that has been proportioned for maximum fire and brilliance.
As the measurements start to deviate from these ideals, the grade drops to Very Good, Good, Fair, and finally Poor. With each step down, you'll see a noticeable decrease in the diamond's sparkle and overall visual appeal.
Diamond Cutting Chart for Round Brilliant Diamonds
The Round Brilliant is, without a doubt, the king of diamond cuts. It accounts for over two-thirds of all diamonds sold, and for good reason. Its popularity isn't an accident—it’s the product of decades of optical research focused on one thing: maximising light return. With its 58 precisely angled facets, this cut is engineered to act like a collection of tiny, perfectly placed mirrors, capturing light and reflecting it back in a dazzling show of brilliance and fire.
But getting that jaw-dropping sparkle requires incredibly strict adherence to ideal proportions. Even a tiny deviation can cause light to leak out, leaving a diamond looking dull, flat, or lifeless. This is where a diamond cutting chart comes in. It’s an essential tool for separating the truly exceptional stones from the merely average, providing the exact parameters for each cut grade, from Excellent all the way down to Poor.
Understanding Cut Grades for Round Diamonds
When you look at a GIA report for a round brilliant, you’ll find a single, definitive cut grade. This grade is a neat summary of how well the diamond’s proportions, symmetry, and polish all work together to handle light. Stones that earn an Excellent grade have proportions that fall within the most coveted ranges, guaranteeing top-tier light performance.
- Excellent: The premier grade. It represents the absolute top tier of craftsmanship for maximum brilliance and fire.
- Very Good: Offers outstanding brilliance and is often completely indistinguishable from an Excellent grade to the naked eye.
- Good: Reflects a significant amount of light and can provide excellent value for money.
- Fair & Poor: These grades have significant issues with light leakage, resulting in a noticeable lack of sparkle.
This detailed chart breaks down the specific measurement ranges for each cut grade, allowing you to see the numbers behind the final grade on a certificate.
Cut Grade Parameters For Round Brilliant Diamonds
Here’s a look at the key measurements that GIA and other labs use to determine a round brilliant diamond’s cut grade. These numbers dictate how light travels through the stone.
| Cut Grade | Table % | Depth % | Crown Angle | Pavilion Angle | Girdle | Culet |
|---|---|---|---|---|---|---|
| Excellent | 53–60 | 58–62.5 | 33.5°–35.5° | 40.6°–41.2° | Thin to Medium | None |
| Very Good | 52–63 | 57.5–63 | 32.0°–36.5° | 40.2°–41.8° | V. Thin to Sl. Thick | Very Small |
| Good | 50–66 | 56.5–64 | 31.0°–37.5° | 39.8°–42.2° | V. Thin to Thick | Small |
| Fair | 48–69 | 55–65 | < 31.0° or > 37.5° | < 39.8° or > 42.2° | V. Thin to V. Thick | Medium |
| Poor | < 48 or > 69 | < 55 or > 65 | Outside Fair Range | Outside Fair Range | Ex. Thin to Ex. Thick | Large |
Understanding these parameters helps you spot potential issues. For instance, a diamond cut too 'deep' traps light inside its pavilion, which can create a dark, shadowy appearance. On the flip side, a 'shallow' cut lets light escape through the bottom before it has a chance to reflect, resulting in a glassy, watery look known as a "fish-eye."
The goal of the round brilliant cut is total internal reflection. When light enters the crown, it should bounce off the pavilion facets and exit back through the crown, creating the sparkle your eye perceives. A poor cut breaks this perfect pathway.
Learning to read this diamond cutting chart empowers you to evaluate a round brilliant with real confidence. It ensures you select a stone that’s truly optimised for the breathtaking sparkle this classic cut is so famous for.
Diamond Cutting Charts for Fancy Shapes
While the Round Brilliant has a standardised, well-documented grading system, fancy shapes like Ovals, Princesses, and Emeralds play by a different set of rules. Their beauty is often more subjective, a unique blend of proportions and visual appeal that can't be boiled down to a single letter grade. Labs like the GIA, for instance, don't assign an overarching cut grade to fancy shapes.
This is precisely why a diamond cutting chart becomes such an indispensable tool. It gives you the specific parameters that influence not just the stone's brilliance, but its entire character and silhouette. Understanding these numbers is the key to choosing a non-round diamond that is genuinely beautiful, not just one that looks good on paper.
Oval and Pear Shapes: The Bow-Tie Effect
With elongated brilliant cuts like Ovals and Pears, one of the most critical visual characteristics to manage is the ‘bow-tie’ effect. This is a dark, bow-tie-shaped shadow that can stretch across the centre of the stone when you look at it face-up.
While a very subtle bow-tie can sometimes add a little depth, a prominent one is a serious flaw. It creates a "dead spot" right in the middle of the diamond, killing its sparkle. The visibility of this effect is directly linked to the diamond's proportions—particularly its depth and pavilion angles. A skilled cutter can minimise it, ensuring light is distributed evenly across the facets for a lively, brilliant stone.
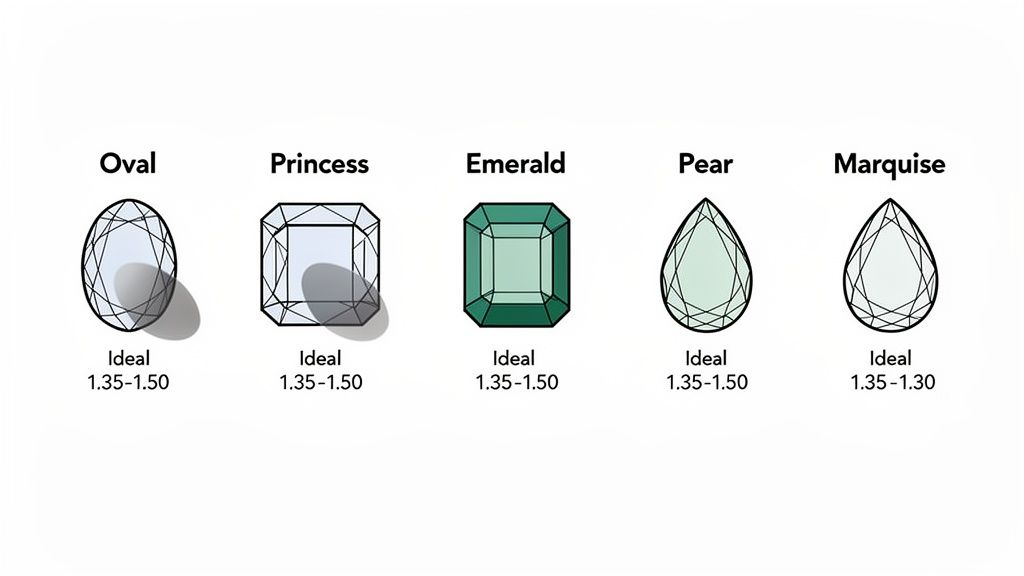
- Ideal Oval L/W Ratio: Look for 1.35 to 1.50 for that classic, elegant outline.
- Ideal Pear L/W Ratio: Aim for 1.50 to 1.75 to achieve the graceful teardrop shape.
Getting this balance right is a real testament to the cutter's expertise. A good chart helps you spot the proportions known to reduce the bow-tie, guiding you towards a stone with much more life and fire.
Princess and Emerald Cuts: Structure and Shape
Princess and Emerald cuts are all about clean lines and dramatic flashes of light. Their appeal lies in their distinct, geometric forms, and their cutting charts reflect this sharp focus on structure.
For step-cuts like the Emerald, the goal isn’t the fiery sparkle you see in a brilliant cut. Instead, it’s about creating a mesmerising 'hall of mirrors' effect. This comes from the interplay of light and dark planes within the long, straight facets and demands exceptional clarity to be truly appreciated.
For a Princess cut, the main objective is brilliance, much like a round diamond, but its square shape requires entirely different proportions to get there. A table that’s too large or a depth that’s too shallow will completely ruin its potential for sparkle.
- Princess Cut: You'll want a depth percentage between 68% and 75% to really maximise its brilliance.
- Emerald Cut: An ideal length-to-width ratio typically falls between 1.30 and 1.50.
The proportions of these stones are crucial not only for their light performance but also for how they will ultimately sit in a setting. You can learn more about how a diamond’s shape influences its final home in our guide to diamond jewellery setting types.
The Importance of Polish and Symmetry
While any diamond cutting chart rightly focuses on proportions, a stone’s final finish is governed by two other crucial factors: Polish and Symmetry. You’ll find these graded on every GIA report, and they represent the true signature of a skilled artisan. They can make or break a diamond's sparkle—even a stone with ideal proportions will look dull if its finish is subpar.
Think of Polish as the smoothness of each facet. A superior polish allows light to enter and exit the diamond cleanly, without scattering, which is what creates those crisp, sharp reflections. Any blemish, like a faint polish line or a scratch, disrupts this path and immediately reduces the stone’s brilliance.
How Symmetry Shapes Sparkle
Symmetry is all about the precision and alignment of the facets. It’s the art of ensuring every facet perfectly mirrors its counterpart and meets at the exact right point.
- Facet Alignment: When facets are perfectly aligned, light is reflected evenly and efficiently right back to your eye.
- Shape Appeal: Poor symmetry can throw everything off, resulting in a misshapen outline or an off-centre table that makes the diamond look unbalanced.
- Light Performance: At the end of the day, excellent symmetry is what maximises a diamond's ability to return light, directly boosting its fire and scintillation.
A diamond's beauty is a combination of its blueprint (proportions) and its execution (polish and symmetry). When all three are excellent, the result is a breathtaking display of light.
Keeping this flawless finish in pristine condition is just as important over time. For expert advice on maintaining that original sparkle, take a look at our guide on cleaning diamond rings.
Questions We're Often Asked
Navigating the world of diamond cuts can bring up a lot of questions. Whether you're choosing a new diamond, assessing an heirloom, or considering a repair, getting the cut right is everything. Here are some clear, straightforward answers to the most common queries we handle in our workshop.
These insights should help reinforce what you've learned in this guide and give you the confidence to make the right call for your jewellery.
Is an 'Excellent' Cut Grade Always Worth the Extra Money?
An 'Excellent' cut grade from a lab like GIA is a guarantee of top-tier light performance, giving you maximum fire and brilliance. That said, a diamond with a 'Very Good' cut often delivers sparkle that’s almost impossible to tell apart from an 'Excellent' with the naked eye, and it can come at a more accessible price.
It really comes down to your personal priorities and budget. If achieving the absolute peak of sparkle is your main goal and it fits your budget, then 'Excellent' is the way to go. Otherwise, putting 'Excellent' and 'Very Good' stones side-by-side is the best way to find that perfect balance of beauty and value.
Do Diamond Cutting Charts Apply to Lab-Grown Diamonds?
Yes, absolutely. The principles of optics that dictate how light travels through a diamond are the same for both natural and lab-grown stones. A diamond’s brilliance is a product of its proportions and finish, not its origin.
Think of a diamond cutting chart as a universal blueprint for sparkle. It’s used to evaluate craftsmanship, regardless of how the diamond was formed. A well-cut lab diamond will be just as brilliant as a well-cut natural one if their proportions both hit those ideal standards.
The laws of physics don't care how a diamond was formed. A diamond's ability to sparkle is purely a result of how precisely its facets have been cut and polished to play with light.
Can the Cut of My Existing Diamond Be Improved?
It can, yes. This is a specialised service called re-cutting. If you have an older diamond with poor proportions, or perhaps one that’s been chipped over the years, a master cutter can reshape it to modern ideal standards.
This process can dramatically boost its fire, brilliance, and overall beauty. It’s important to know, however, that re-cutting always involves a slight loss of carat weight. We always have a thorough consultation first to weigh the benefits of improved sparkle against the reduction in size, helping you decide if it’s the right choice for your stone.
Why Don't Fancy Shapes Get a Single Cut Grade?
Fancy shapes like Ovals, Pears, and Emeralds don't receive one overall cut grade from labs because their proportions are far more subjective. Unlike the round brilliant, there isn't one universally agreed-upon set of 'ideal' angles and ratios for these shapes.
For example:
- Some people prefer a longer, slimmer oval, while others want a wider, more rounded one.
- The appeal of an emerald cut's mesmerising 'hall-of-mirrors' effect is also a matter of personal taste.
Because there's so much variation, grading reports for fancy shapes focus instead on Polish and Symmetry. This makes using a detailed diamond cutting chart—and getting expert advice—even more critical when you're hunting for a truly beautiful fancy-shaped stone.
At Opulence Jewellery Services, our master jewellers use these exact principles every day to assess, match, and cut diamonds for repairs and bespoke creations. If you have a question about your diamond or need expert care for a treasured piece, visit us in Hatton Garden.
Explore our full range of expert services at https://www.opulencejewelleryservices.co.uk.